The AMEX Platinum currently has a 60k membership points bonus if you spend $5k within the first 3 months of opening the account. This card also has a steep annual fee of $550 (not waived the first year) so it’s not for everyone. The 60k points could easily net you $1,200 worth of travel and cover your annual fee for 2 years if you didn’t derive any other benefit the card offers. AMEX membership points can be transferred to a multitude of airlines and hotels. I received an upgrade offer from AMEX a few months back that offered 60k points and I jumped on it. I still rate the Chase Sapphire Reserve as the best among the premium credit cards. However, the AMEX Platinum might actually be of greater value for some of you. Here are some of the benefits you can get with the AMEX Platinum:
1) 60k bonus points after spending $5k over the first 3 months

AMEX Membership Rewards points have a lot of value because of the multitude of airlines and hotels they have as transfer partners. Among the airline partners: Delta, Etihad, Emirates, Singapore, British Airways, Iberia, Air France/KLM (via Flying Blue), etc. Hotel transfer partners include Starwood, Hilton, and Choice hotels.
2) Credit for Global Entry or TSA Pre-check


AMEX will reimburse you the $100 fee for Global Entry or $85 for TSA pre-check. If you are in a major metro area, Global Entry is the way to go since it automatically gives you TSA pre-check. I’ve had TSA pre-check for about a year now and saves you from the inconvenience of taking off your shoes, removing your laptop/electronics from your carry, and going through X-ray machines. Plain and simple, it saves a lot of time. Both of them are good for 5 years.
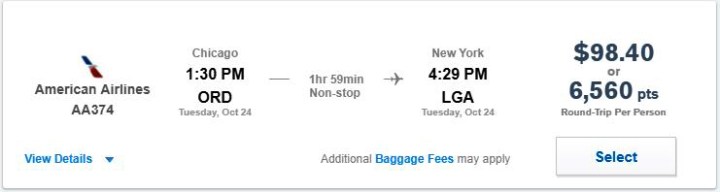
3. $200 in annual airline fee credits
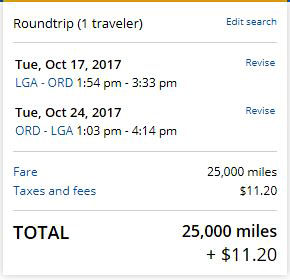
For this benefit, you have to select a particular airline and you would get reimbursed for incidental fees such as checked bag fees, in-flight internet, and in-flight food purchases. It’s not nearly as valuable as Chase Sapphire Reserve’s $300 travel credit, which covers everything from airfare, hotels, tolls, parking fees, etc. However, there is a way to get around this if you desire credit towards airfare instead. If you use this card to purchase $200 worth of American Airlines gift cards from AA.com, AMEX will treat it as an incidental purchase and credit you back the $200. Here is a screen shot below:

It only took two days for them to reimburse me and I was able to put the gift cards to use a month later. I don’t think this trick works for any other airline. This was far more beneficial in my opinion since I don’t end up checking-in $200 worth of bags in any given year.
4. $200 Uber credit annually

This is a really nice perk that can really help offset the annual fee for those who find themselves using Uber on a regular basis. AMEX gives you $15 Uber credit for each month and in December, they give you an extra $20. Just link the AMEX card with your Uber account and use that as the method of payment.
5. Complimentary Boingo Hotspot

We still live in a world where many airports still don’t offer complimentary wifi access for more than a half hour. If you don’t find yourself transiting through one of these airports often, this perk may not be a huge deal. However, if you’re frequently traveling or connecting through airports such as Chicago’s O’Hare and Midway, NYC’s LaGuardia, JFK, and Newark, or LAX in Los Angeles, this might be of great value. These airports offer complimentary low speed wifi for 30-45 minutes. By the time your website is done loading, you have half the time left. This perk allows you to have complimentary access to Boingo’s higher speed internet, which would usually costs $7.95 per use.
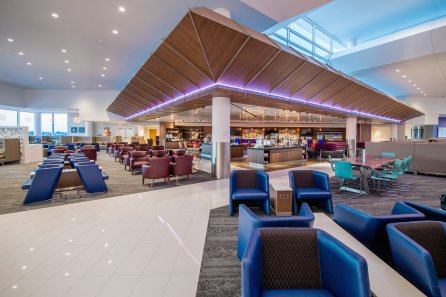
6. Complimentary Access to AMEX Centurion Lounge

If you are a traveler that routinely transits through New York’s LaGuardia, Seattle-Tacoma, Miami, Dallas (DFW), Houston (Bush Intercontinental), San Francisco, Las Vegas, or Philadelphia, having Centurion lounge access is an awesome perk to have. You get complimentary drinks, snacks, meals, massages (DFW), really high speed wifi, and a place where you can unwind between flights or just get some work done. You can also bring two guests free of charge. To get an idea of what the Centurion Lounge is like, you can read my review of the lounges at LaGuardia and Dallas-Fort Worth right here and here.
7. Complimentary Access to Priority Pass Lounges
Here is another valuable perk to have if you find yourself at airports that have lounges that are part of Priority Pass. Priority Pass has over 1,000 lounges at airports all over the world. There are even restaurants such as Timberline’s Steak and Grille (Denver International Airport) that are a part of Priority Pass. At Timberline’s, each guest gets $28 worth of credit towards food. So you and two guests can actually get $84 off an entire check.
8. Complimentary Access to Delta Sky Club (When Flying on Delta)
If you fly on Delta frequently, add this to the list of perks that comes with the Platinum Card. You would have access to Delta Sky Club lounges from coast to coast. Just show them your boarding pass and AMEX Platinum card and you’re in.
9. Gold Status for Hilton and Starwood Hotels


If you play your hand right, this benefit can cover the entire cost of an annual fee and then some. Having Hilton Gold status makes you eligible for free upgrades at any Hilton Hotel. You also get complimentary breakfast and high speed WiFi. A couple of months back, my wife and I took a trip to Maldives and stayed at the Conrad in Rangali Island. Hilton gave us a complimentary upgrade from a water villa to a retreat water villa during our 4 nights there. The value of our upgrade was over $500. This doesn’t even include the complimentary breakfast, lunch, and mocktails we enjoyed as Hilton Gold members. Add that to the value of the upgrade and we derived well over $700 worth of value simply by having Hilton Gold status. I haven’t put the status to use at any Starwood hotels just yet, but I’ll keep you posted if I do.
10. Earn 5X Membership Rewards Points on Flights Booked Directly with Airlines or via AMEX Travel
This is the highest earning credit card for booking flights. You also earn 5X the points for booking a hotel through AMEX Travel. For the flights, you can’t book it via Expedia, Priceline, Orbitz, or any other third party site. For the hotels, it has to be booked via AMEX travel. I’m really hoping in the future they just give you the 5X for all travel related purchases. Chase Sapphire Reserve gives you 3X Ultimate Reward points on anything travel related. It doesn’t matter if you booked on Expedia or directly from the hotel/airline.
If you are going to apply for the the card, do it during a time when you know you’ll be spending $5k over 3 months. Due to its exorbitant annual fee, this card isn’t a long term keeper for a leisure traveler who only travels once or twice a year or an individual who doesn’t travel for work. If you find yourself in a scenario where you can derive the benefits and perks routinely, this card can be extremely rewarding.